19 Jan 2014
by CGT - 0-Impact Guitars
in boutique guitars, Custom Finish Options, Custom Guitars, Guitar, handmade guitars, Music, Musical Instruments
Tags: 10-string, 7-string, 8-string, enhanced bridge system, guitarbridge
So if you have read any of my posts you know that I have worked with “bell brass” quite a bit in the past as a tremolo block mass extender / enhancer. I use it generally when I do a custom project where the client is requesting a recessed tremolo variation. Since we loose a portion of the length of the block, I generally replace it with a shorter but fatter version. This really enhances the tone by sharpening and enhancing the usable frequencies-
I have taken this to the old style Jag / Jazzmaster bridge design as well. By enhancing the block, the tone benefits greatly. I have several of these designs available and have custom made them for Jazzmaster players around the world-
I have a new project I’m developing to travel to shows that uses multi-scale / fanned fret design. Currently, we are limited in our choices if we are designing an instrument. A designer I admire quite a bit has a system based on the ABM design. But I wanted to take my experience with the bell brass, and attempt to incorporate it into my design.
By mounting the entire system onto a precision machined bell brass plate then onto the body, frequencies are enhanced by the plate prior to being transferred to the body for final shaping. The plate can be mounted to the body directly or recessed (recomended)
I plan to make the new eX system available in virtually any scale / string configuration or design giving the builder and designer as many options as possible.
Enter my eX6+ (prototype) Bridge System. Each system is custom configured for the exact scale and string spacings requested as per the design. There are options for the saddle insert materials, Brass, Stainless Steel, Copper, Tusg, Bone or graphite- This gives you the ability to mix and match the materials to develope a truely unique instrument with the exact textures you desire / require for your compositions.
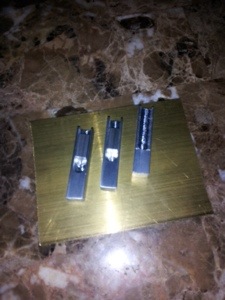
Each saddle has the option of insert material as well as height and precision intonation adjustment.
The saddle carriage and plate can be anodized providing a huge pallet of color options to match and enhance your design and provide exceptional protection.
This is in the prototype stage right now and I expect to have the first 6 string version tested in the next few weeks, check back soon. And as always, if you have any questions please contact me HERE
07 Apr 2013
by CGT - 0-Impact Guitars
in boutique guitars, Custom Finish Options, Custom Guitars, Guitar, handmade guitars, Music, Musical Instruments, Uncategorized
Tags: boutique guitars, casper guitar technologies, custom guitars, elite guitars, guitar builders, guitar shop, Private Stock, Sublime, tree of life
So I’ve been hearing about this new method of drying lumber that is alleged to correct some stability issues. The wood in

Interesting flame figure-
question is maple. Seems to be most varieties tend to shrink and expand with heat, moisture / humidity and altitude (minute but existent). This causes in the most extreme cases, intonation problems until stable. Cracking finish and even cracked neck.
Now, I’ve been playing guitar for over 40 years. I’ve lived in Ohio, Korea, Germany, Alabama, Mississippi & South Florida. I’ve also traveled all over Europe with a few guitars and I can say the phenomenon is real. I have a guitar I built back in 1985 and a Steinburger (Factory Mod GP2T) The graphite neck seems to be the most stable as far as tuning / intonation goes. I’ve never seen either one of those guitars cause any problems with the neck joint or expansion around the tuners or other hardware.
So Like I said at the start, I heard about this Roasting technique and was naturally intrigued. I read up a bit on the process and benefits and agree for the most part with the theory. Like I said, I have seen some of the location / environment effects on guitars. I would like to see if this innovation is worth the effort.

as shipped roasted maple stock-
First off, the material is not the easiest to track down. Not as many people producing it as you would think. But those that do, are quite proud of their processes. I won’t mention any here. do a simple search to generate a good list to start with if you are interested in acquiring a piece to try out. If not, leave it to your builder to get if you wish to test out the material after this-
I purchased about 10 feet. Had it cut into 36″ chunks for shipping. When it arrived, it smelled like a camp fire. (Good in my book, if you don’t like the smell of a fire out by the camp then this isn’t your wood). This smell is even more present when you start to work with the wood. I enjoyed working this material.
Since the process drives virtually all of the moisture out of the wood, it does seem to tare just a bit. Not horrible but you must control your tools and remove very little amounts during the contouring phase as well as the filing-
Over all, the board worked well for this application. I will be continuing this build as well as testing by shipping it overseas as well as around the US for climate test / stability.
If you would like more information on this or any other Casper Guitar Technologies project, click HERE-
//
26 Feb 2013
by CGT - 0-Impact Guitars
in boutique guitars, Custom Guitars, Guitar, handmade guitars, Music, Musical Instruments, Uncategorized
A few post’s back, I wrote about the modifications I do to a Jazzmaster Tremolo to enhance the experience with the boutique bridge from Mastery and the likes.
What I do is increase the mass of the tremolo by adding a brass plate to the tremolo, replacing the weak plate that comes  with the tremolo standard.The standard plate weighs about 30 grams where my plate weighs in at almost 70 grams.
What I source is a nice brass plate from the same metallurgist shop that produces the bell brass used by high end chimes and bell manufacturers. I have found over the years that this really improves the response of the guitar and increases the sensitivity and accuracy of the bridge.
 The plan is to have this assembly installed into my Jazzmaster with a set of custom P-90s in the next few weeks. As soon as I do, there will be some files posted.
05 Feb 2013
by CGT - 0-Impact Guitars
in boutique guitars, Custom Guitars, Guitar, handmade guitars, Music, Musical Instruments
Tags: boutique guitars, casper guitar technologies, CGT, curbow, custom engraving, custom guitar, custom guitars, Electric Guitars, elite guitars, guitar builders, guitar shop, inlay technique, Private Stock, tree of life, vine inlay
The Curbow 2 –
So after rushing to get the Curbow #2 project into a presentable mode before Christmas Eve, I delivered it to my client with the electronics disconnected and the control cavity cover not installed.
I now have it back as well as her sister for a small action adjustment and a photo shoot-

Curbow 2 Antiquity Pups

First Completion – Curbow1

Curbow Completion 2

Birdseye Neck with Ebony Fingerboard
I’m testing a few methods to record simple samples for this blog.
This first test is using my iPad and garageband to record a simple test.
03 Feb 2013
by CGT - 0-Impact Guitars
in boutique guitars, Custom Guitars, handmade guitars, Music, Musical Instruments, Uncategorized
Tags: boutique guitars, casper guitar technologies, CGT, custom guitar, custom guitars, Electric Guitars, elite guitars, guitar builders, guitar shop, guitars and cars, Private Stock
Tremolo’s come in a variety of flavors as one would expect in the world of guitars. But when it comes to locking tremolos, I like to use the Schaller Version. They are made under the same license / concept as the Floyd Rose and are made by the same company in Germany that made the original Floyd.
 Many years ago, I discovered that the tremolos that had some weight to them really had a hands down tone advantage over the lighter weight varieties. So in pursuit of that tone, I began to experiment with various materials that would increase the mass at the block and eventually landed upon Bell Brass. It’s resonant characteristics as well as it’s increased density create the mass I was looking for in the correct size as well. Brass is an easy material to mill as well so it adds to it’s usefulness in my shop of limited metal working capabilities.
To procure a block, there are several manufacturers of these blocks out there. Just do a search on the internet and find the flavor of your choice. I use a shorter block due the the fact I recess the tremolo’s on most of my projects. The shorter block is required due to the depth of the block. If you use the standard 42mm block, it will normally protrude out the back of the guitar causing stability issues while being played as well as hanging up on your outfit / clothes during playing.
When you get your block, remove the saddles from your bridge being careful to maintain their order. Most versions have some radius and mixing these up can cause issues with proper string height and radius.

 Next, remove the 3 block screws. Be careful to maintain control of the block and bridge. There are 2 plates between the block and the bridge base plate. Be sure to maintain the orientation of these plates. They have a purpose and must be placed back in the same position.
The block may have a specific orientation as well. be sure you evaluate your block to be sure it is being placed onto the base properly. Using the screws that came with your block, secure the parts together and tighten the screws pretty snug.
Replace the saddles in the proper orientation and secure the saddle screws. Your now ready to install the bridge into your guitar. Set your height, string it as normal and play. You’ll notice a bit more punch, more bite and sustain that may last for days. This in one of the single most dramatic upgrades you can do to your guitar that doesn’t involve solder. It is fairly simple to perform but may prove to be a bit too daunting for the novice. If you doubt your DIY capabilities, your local shop should be able to help you out.

To see this in action, click HERE
07 Jan 2013
by CGT - 0-Impact Guitars
in boutique guitars, Custom Guitars, Guitar, handmade guitars, Music, Musical Instruments
Tags: boutique guitars, casper guitar technologies, CGT, custom guitar, elite guitars, guitar shop, Ibanez, JEM, Private Stock, Sublime
 So I’ve started on the layout of the new Private Stock JEM Style Project with the new Sublime pickups to be installed. The body is a 3-piece Alder blank using the tracing I made of a previous clients RG-, The shape has been cut out, sanded to clean up the shape and edges, all routing has been completed. I just completed the shaping this afternoon.
 Earlier, I cut out the neck shape, routed the truss rod channel and cut the fingerboard. The neck is assembled and glued. This will set clamped for at least 24 hours before removing the clamps and being hand sanded to its final taper and width.
The inlay is minimal on this project so I didn’t feel the need to perform that step prior tho the neck being assembled. There are a few simple holes to be drilled and the dots inserted, sanded and filled then the frets can be installed.
This week, I’ll be applying the sealer to the body and beginning the finish process. This project will be getting a single stage lacquer finish with a clear coat. I intend to use red as the base coat then apply a gloss black over that. That way, as this guitar wares, the red will show thru.
For more information on this or any other CGT project, check here-
31 Dec 2012
by CGT - 0-Impact Guitars
in boutique guitars, Custom Guitars, Guitar, Music, Musical Instruments
Tags: boutique guitars, custom shop, elite guitars, guitar builders, guitar shop, Jazzmaster, Private Stock
Since I wanted to have a special guitar here, I decided to go with a figured wood for the neck stock. I have been and continue to be a fan of the laminate neck. I know some purists will frown upon this in some instances but I prefer this design for my builds. It really gives me a lot of flexibility in my material selection thus adding to the pallet of tonal choices.
For this project, Curly Maple for the stock and a nice Pau Ferro fingerboard. I really like the Pau Ferro material. Very consistent from piece to piece and has very similar characteristics to that of Ebony. I plan to keep this guitar pretty much stock in appearance so no fancy inlay on this project. I’ll be using some White Mother of Pearl Fret markers (dots) on this build. I’ve also decided to use my modified version of the 60’s Fender style peg-head for this project. My scooped peg-head just doesn’t quite fit this build. So I’ll do a bit larger peg-head with a slight variation in the lower portion of the peg-head.
Here are a few of the specifications on the neck for those of you keeping score:
- 25.5″ scale

- 12″ – 16″ compound style radius
- 42mm wide at the Nut
- 56mm wide at the 12th Fret
- 20.5mm thick at the 1st Fret
- 21.5mm thick at the 12th Fret
My Private Stock guitars are available for sale, but I build them as if I were building it for myself. Therefore, I plan to use Med / Jumbo Stainless Steel Frets on this project from Jescar – FW47104-S. Stainless Steel frets give you a bit more slick feel and they last bit longer between maintenance re-crowning etc. Next will be the Truss Rod layout as well as the fingerboard installation onto the neck blank. If you have questions about this project or any other project, click here–
27 Dec 2012
by CGT - 0-Impact Guitars
in boutique guitars, Custom Guitars, Guitar, Music, Musical Instruments, Uncategorized
Tags: boutique guitars, casper guitar technologies, custom guitar, custom guitars, Electric Guitars, elite guitars, guitar builders, guitar shop, JEM, Private Stock, Sublime, tree of life
As you know, last month, I completed the build of a JEM Tribute guitar for one of my long time clients in Canada. He usually does reviews of his projects on the forums and blogs etc. Since he does these reviews, he likes to  use companies he hasn’t used in the past so he can get new vendors and companies a bit of press and exposure. One of the companies he used, and subsequently introduced me to was Sublime Pickups out of Hungary. (Sublime Pickups) once the page opens, click on the button with “Bezar”
After being introduced, I received a set of pickups from my new friend Andras for my clients guitar. I immediately discovered these pickups were not your usual breed of pickup. They were pretty hefty and seemed to be pretty well made and solid. Nice polish to the chrome covers and the engraving was very eloquent. Once installed, it became evident these were not your normal pickups. Very cool tone and some features I like to see in my select builds such as nice volume response, concice and clear note separation, some very cool natural distortion and a subtle ring (like a bell ringing the exact note being played) by design to offset the note of the wood (mahogany body).
Once I completed the project, I delivered it to my client and he is still playing around with it. Testing out all the versatility of the guitar and it’s ability to adapt to many playing styles. Once the review is published, it will be noted here in my blog.
But that isn’t where this story ends-
After a few weeks, I was contacted by Andras, the creator of the pickups. He let me know that there were a few sets in the US that were stranded at a test facility that was no longer able to conduct his testing and he would like to know if I would like to receive them and conduct the testing for him as well as complete the shipping process on an additional set for an artist located here in the States. I naturally accepted and have since received the pickups.
 So given the fact that these pickups really set off a fire storm with the JEM build, I’ve decided to build another private stock variation of the JEM I did last month. This version will be built based on a 2 – piece alder body finished in either a translucent black or a black metallic finish. A rock maple neck with an ebony fingerboard and Red Inlay to match the pickups I received, stainless steel 5100 frets. In addition, the version I build will have the “Grip” but it will not have a Center Pickup. So basically it will be an RG of some sort with rear routing and mounting rings. I’ll add a variety of switching options since the pickups have been setup for just that option. As a mater of fact, the neck pickup has been designed specifically for the coil tap option to reduce the output on demand.
Just a bit of detail on the pickups:
- Style – Red Resin Cast Humbucker with custom artwork engraved – (that’s a whale on the bridge pickup, the neck graphics are pretty self explanatory I think)
- Neck – Distant Land with DCT 17.2k / 9.3k
- Bridge – Deep Ocean Blue – 19.8k
Once again, the bridge of choice in my shop is the CGT Modified Schaller Double Locking (Floyd Rose License) with the shortened, increased mass brass block will be used on this project as well as the Schaller Staggered / locking tuners, all chrome-
For additional information on this or any other CGT projects, click HERE–
26 Dec 2012
by CGT - 0-Impact Guitars
in boutique guitars, Custom Guitars, Guitar, Music, Musical Instruments
Tags: boutique guitars, casper guitar technologies, curbow, custom guitar, custom guitars, Electric Guitars, elite guitars, inlay technique, pearl inlay, Private Stock, tree of life, vine inlay

Curbow #2 85% Completed
Hello to all, I hope your Holiday has been everything you expected and you were on Santa’s Nice list. If not, then I expect you had a good time last year.
The Curbow build is almost completed. At this time, all routing has been completed, the bridge has been placed into position, the pickups have been installed, the string height has been set and the neck relief has been initially set. There are still a few setup maters to address but the guitar is playable to get a feel of how it will play. Once the client returns the guitar, I’ll complete the setup and electronics, polish and clean the guitar for final presentation.
Here is what is left to complete on this project:
- Finish sanding and polish / buffing. There will not be any finish applied to this body given the material – Purpleheart. The client wishes this piece remain natural
- Electronics need to be connected. This is still in the design phase. My client is weighing the switching options so we have yet to nail down the switching / voicing. The pickups however, are “Golden Age” variety. They are of the vintage tone / voice similar to that of the PAF’s and a Jazz pickup for the neck position.
- Installation of the RFID Theft recovery device provided by Snagg

Curbow #2 neck-joint
My client is having this guitar commissioned as a gift for his wife, so this was a perfect opportunity to present it to her as an extra Christmas gift. My client contacted me about 1:30 Monday afternoon to arrange the drop off. I was able to leave the Pig Roast at my house for the evening to deliver it to him at the studio by 6:00 PM on Christmas Eve. Just in time to be wrapped and placed under the tree for the morning. I’ll be getting this guitar back the first of the week to wrap up the remaining tasks but the overall project to the point where it can be played and it’s voice can now be heard.
For additional information on this project or another CGT build, click HERE–
Previous Older Entries


